")
I’m feeling inspired by Spring. Not that the flowers are blooming in Chicago. Yet …
though I did spot a few buds poking their way out of the ground yesterday. Which gave me hope.
But until the daisies fully bloom, I thought I’d make my very own bouquet. On mason jars, of course!
 2")
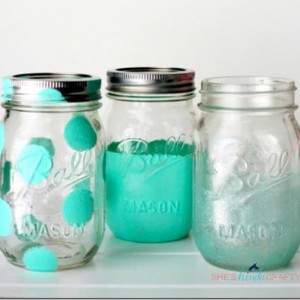
PAINTED DAISY MASON JARS TUTORIAL
")
I stared by giving my jars three coats of teal acrylic paint in matte finish. I lightened my color with one part white paint to two parts teal.
")
After they dried overnight, I distressed them with 80 grit sandpaper.
")
To paint the daisy petals, I used a gloss enamel craft paint and a small brush. For each petal, I started my brush on the outside edge and pulled back to the center.
")
Each daisy has six petals.
")
For the centers, I used a high gloss paint and a small pointed brush.
")
I dipped the brush in the paint and then dotted n the centers of the petals.
")
Once dry, I gave them all a coat of clear spray finish in matte.You can find my “go to” clear finish that I purchase at the craft store by clicking here …
")
I’m also selling this set in my Etsy shop (click here for listing).
Linda
Sharing: * The Turquoise Home * A Stroll Thru Life * Tip Junkie * Savvy Southern Style * Between Naps on the Porch * The DIY Showoff * Inspiration Monday *


I love these mason jars they are so pretty and make me happy. Can’t wait to try to do one. Thank you for all the great Mason jar tutorials.
Love these and am not the best at art but they look very pretty so am going to give them a go. Thank you. I have saved to my house board
So very adorable. I just love all the ideas you come up with for this blog and your shop.
Please don’t eat the daises as they are painted on the jars 😉
That sure looks cute!
I hope you will share your jars with our Link Up – Idea box:
http://milaslittlethings.com/2015/04/idea-box-thursday-link-party-6.html
xx
Mila
These are adorable! What a fun spring project.
I was instantly drawn to these from the Inspiration Monday linky party because I love that teal/turquoise color! These are so cute! I pinned to my DIY Home decor board.
Thank you for posting this tutorial. It took me a long time to get started because I’ve never tried anything like this before, but you made it easy to understand, and I’d say my jars, while definitely not as nice as yours, turned out pretty darn cute!
I fully understand the whole taking a long time to get started on a project that you’ve never attempted before! Most of my home DIY falls into that category! I’m so glad you dove in and gave it a try! And happy to help!!! 🙂
These are so cute! I am sharing this on pinterest.
Thanks! 🙂
This looks so pretty that I’m actually going to try painting a jar this weekend. I hope mine’s turns out just as pretty as this one. A really great diy 🙂 I also featured this diy on my blog. http://www.craftsonfire.com/2017/01/20-amazing-diy-mason-jar-projects.html
I have a great tip for doing dots on anything. Instead of using a brush to do the dots, I use different sized brushes and use the other end of the brush to dip in the paint. To make them all the same size, dip your brush in the paint each time you do a dot. If you want your dots to varagate, dip in the paint once and do dots 3 or 4 at a time, dip in the paint and do it all again. Clean your brush tip each time you do a dot except if you are doing the varigated (large, med, small). Hope this little tip will help all the artists out there. Experiment with your different size tips.
I can’t find the Martha Stewart yellow paint at my Michaels for the center of the daisy’s. Do you think I could use this kind instead in Bright Yellow?
https://www.michaels.com/americana-gloss-enamels-paint/10546270.html
Absolutely!!! Just use a gloss yellow.