
It feels like forever since I’ve created a mason jar craft here for you all. And yet, each and every day I’m working with mason jars to fulfill Etsy shop orders. At any point in time, there are upwards of 40-50 jars in various stages of paint and drying and distressing and sealing and packing and shipping.
Phew.
I’m exhausted just thinking about it!
I thought with these Easter egg mason jars, I could do the whole one bird with two stones thing. I can share how I made them here …
and put them up for sale on my Etsy shop there.
How to Make Easter Egg Mason Jars
")
1. Start with two coats of your base color. I let my first coat dry overnight before applying the second coat. Let dry 24 hours before proceeding to next step.
")
2. After jars have dried for 24 hours, tape off your Easter egg patterns on your jars. I use washi tape, which you can find in most craft stores (I’ve also spotted it in my office supply store too). I opted for one zig zag and one striped pattern. The pink jar will get dots using the round foam brush.
")
3. Apply your contrast paint colors to tape off areas.
")
4. Once dry, remove tape. I had some areas that required a few touch ups.
")
5. Touch up areas that were pulled off by tape and/or where paint leaked under tape. Let dry 24 hours.
")
6. Once jars have dried for 24 hours, distress with 80 grit sandpaper. I focus on raised areas and the threads on top.
")
7. Finish with some dots. I just used a medium tipped paint brush for this step. I used alternate colors on the jars and added in a bit of white too.
")
8. Voila! You have now created …

Linda

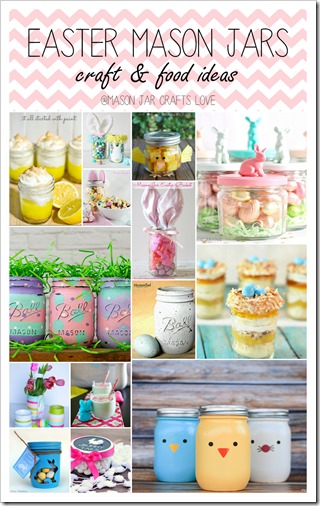
For even more mason jar Easter ideas, click here ...
Sharing: * Link Party Palooza * Savvy Southern Style * Between Naps on the Porch * The DIY Showoff * The Scoop * A Stroll Through Life * The Inspiration Gallery *


These are SO cute Linda! You always have cute jars, I always see them on Pinterest! I love the shamrock ones too! Ive been meaning to stop by. 🙂
Nice to see you again, last time we met there was that photo issue on Etsy…. I had to do it again and shut down an IG account, 27 images they were using!
That’s terrible Kelly! But your photography is just too good! So happy you stopped by! 🙂 Linda
Adorable Linda. But WOW, the time involved in making these. You really do very good work dear!!
Thanks Kelly! I figure I could charge a premium price at the shop for this set …
Absolutely!! And you’ll sell them too for sure!
The jars are so cute. Perfect for Spring!
These are so cute and ready for Easter. Love them.
Bev
what kind of paint did you use?
I used acrylic craft paint on these jars. You can find it at the craft store. Just make sure you get the matte finish (not enamel or multi-surface).
These are so adorable!! Love this idea!
I followed instructions to the tee but paint peeled as I applied the second coat!!!
I find that you have to try and handle them as little as possible when painting the second coat. I just hold in one spot and the paint sometimes will come off but I can fix that after I put them down. Does that make sense?
What size jars did you use?
I used the pint size regular mouth jars.
These are great for easter,but do you have to use sandpaper?
Nope! You don’t have to distress them if you don’t want. I just find that distressing helps to cover up some imperfections. But that’s just me!
Hello! What kind of brush do you use for the base coat?
I use the smallest brush in this pack: http://amzn.to/2Cu1JWh
Thank you! I want to do one with a bunny stencil (ie: yellow paint with a clear bunny shape to show a peek of robins eggs in the jar) but I have never stenciled and do not know what supplies to get/how to us them. Do you have any advice?