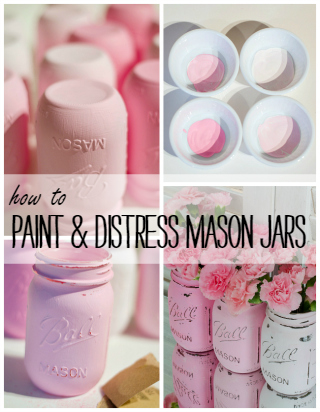
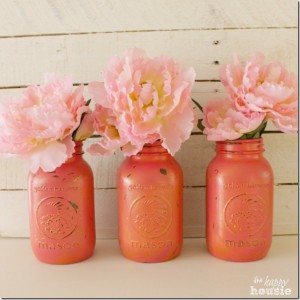
Painted Mason Jars: Pink – How to Paint and Distress Mason Jars.
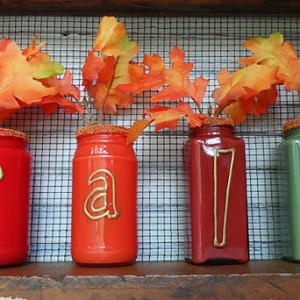
**** If You’re Looking for the Maple Leaf Mason Jar, Click HERE *****

You’d be surprised at how many questions I get about my painted mason jars. And not just questions at my Etsy shop about colors and quantities and sizes and discounts …
and how much would it cost to ship a set of three to Sydney, Australia {$27.85}.
No, I get emails about the type and brand of paint I use {just plain old craft store acrylic paint}. Or if there’s some special brush or applicator I use {nope}. And cries of why oh why isn’t it working right …
“the paint isn’t sticking” …
“the paint is peeling off when I distress” …
“help! why don’t they look like yours?”
And as I read these emails I can almost hear the desperation in their voices…
So I thought it was time, once and for all, to give a detailed picture-filled tutorial on how to paint and distress mason jars. Using the very same mason jars I’ve created to give away to one lucky winner as part of a giveaway with Savannah Attic (entry here).
how to paint & distress mason jars
Materials*
Pint Size Regular Mouth Mason Jars
Rubbing Alcohol
Acrylic Craft Paint (I used Folk Art Bright Baby Pink & Americana Snow Titanium White)
Paint Brushes
Paint Brushes
Clear Coat Sealant in Matte Finish
1. Clean Your Jars!
If you’re not using brand spanking new jars straight out of the case, then be sure to clean the outside of the jars thoroughly. Wipe down with rubbing alcohol and then wash with hot soapy water. Dry completely …

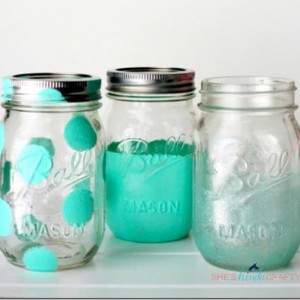
2. Mix Your Paint.
Okay, this step only makes sense if you’re making an ombre set … or if you want to lighten a color you already have on hand. For my pink jars, I started with Americana brand acrylic paint in “Baby Pink” that I purchased for around $1.00 at the craft, and then just added craft store acrylic white paint until I arrived at my desired color palette …

3. Paint. Two Coats.
I start at the top, then turn the jars over and paint the bottom half. I give it a final brush stroke from top to bottom all the way around to even things out. Once dry to the touch, give them a second coat of paint.

4. Let the Paint Dry. Overnight.
This is the hardest step. Because it involves patience. But you must wait. Let them dry overnight. The paint needs time to cure and adhere to the jar. If you don’t, you’ll be peeling the paint off in strips. Haste absolutely leads to waste on this project …

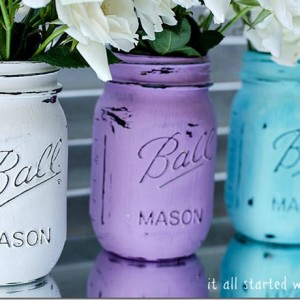
5. Distress.
I start with 120 grit sandpaper and sand around the top threading and bottom first; then I sand the raised areas with 100 grit paper. I save the “Ball” logo for last and carefully remove the paint using an emery board. And, I must admit, that I also resort to using my fingernail to remove some paint from the logo as well.

6. Seal.
I finish it all off with two coats of clear sealer in either a Satin or Matte finish.

And now the jars are finished and waiting to be packed up and sent to our lucky winner!

Whoever that may be. Because there’s still time to enter the giveaway and win this pink ombre painted mason jar set. Just click here to enter …

P.S. The pink ombre mason jars are also for sale. Just visit the Shop tab.
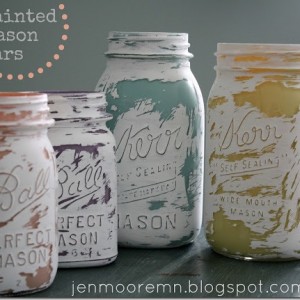
P.P.S. For even more painted mason jar ideas, click here …
Pin It!
*affiliate links included.


These are my favorites…they are just so dreamy! Thanks for sharing the DIY with us!!!! You rock and so does this site!!!! hugs…
They are so eye catching! Hope you give yourself enough credit for these because they’re not all that easy to do if you want the perfect look!
These are so pretty! I really love them in pink 🙂 thanks for sharing how you did it! 🙂
wish you a beautiful weekend!
Ingrid
These are absolutely beautiful! I was just looking for shabby chic things for my daughter’s room when my friend posted this picture on FaceBook! Hark! These are perfect. What makes them even more fun is that my family has ties with the Ball corporation, and its University that go back years. These will be so special to make and to proudly display in our new house. 🙂
So pretty. I am going to have to try this. Thanks for the inspiration.
Rebecca
These are so adorable!! I love and pinned it 🙂
Is Americana Baby Pink paint found in craft stores? Is Americana the brand name?
I love these in pink, so adorable with the flowers and shade variations!
I love these jars! Thanks so much for the tutorial on how to make the cute jars.
KC
Hi love your mason jars, and I glad you did a tutorial, I would love to feature them, if that would be ok please let me know
lauren
Oh so pretty!!! Thanks so much for the tutorial! Would love for you to share at Amaze Me Monday!
Blessings,
Cindy
LOVE these Mason Jars!!
Thank you for the tutorial and such lovely photos.
Off to try my hand at making me a set of pink ones and……… maybe some robins egg blue ones.
Thanks for sharing!
Elizabeth
I have been wanting to do this, it is beautiful!!
I would love for you to come link up to my Paint Party going on now http://startathome.blogspot.com/2013/07/paint-party.html
Hope to see you there
Brooke
Start @ Home
Oh my gosh! I LOVE your pink mason jars! Simply, beautiful!
I think I might have to do this for an upcoming GIRL baby shower!
Thanks for sharing!
How lovely!!!! The pink looks so soft and pretty, and the jars look beautiful with the flowers!
They are beautiful, thanks for the great tutorial.
These are so pretty!!
Ellya
So pretty in pink. love the vintage look. Great photo tutorial.
These are so pretty and unique!! I love them! Have a great day, Lori
These are beautiful! I’d love to do the ombre look in blue! Did you paint the original picture jars (not the jars in the tutorial) with a dark brown/black paint before painting them pink? They look different when distressed then the one in the tutorial. Thanks 🙂
These are gorgeous! Such a beautiful and inexpensive centerpiece idea. If you get a chance, please link up to my linky party: http://suburbsmama.blogspot.com/2013/07/sunday-linky-16.html
Great tutorial, Linda. Thanks!!
These are super darling! I would love it if you would come and link this up at my link party
Dandelion Wishes Wednesday. I’m also pinning this 🙂
How pretty!
Thanks so much for letting me feature your mason jars and you can see the post here…
http://westfurniturerevival.blogspot.com/2013/07/revival-monday-120.html
lauren
Love these…just beautiful ! Would love it if you came by and shared at http://www.onemoretimeevents.com on Sunday!
Hi Linda! Thank you so much for the step by step tutorial. I have had my mason jars and paint all ready and just need to get started. I am soooooo impatient so I’m happy you mention to let it dry overnight because I definitely wouldn’t have done that, lol. I am loving your new theme {on here and on It All Started With Paint}! Have a great weekend!
~Katie @ Upcycled Treasures
I just love your project! The flowers look so sweet! Pinned:) I posted anchors aweigh to Life on Lakeshore. Stop in!
Gosh, those jars are gorgeus !!! Thank you soooo much for sharing this tutorial with us ….
Bless you 🙂
Kinga
What flowers are these? I am making the jars for centerpieces for my daughters birthday party and would love to use these flowers!!
Hi – not sure if anyone replied, but these are carnations. You can buy beautiful “fake” ones at Michaels. Peonies come in different pinks too and they would look beautiful and quite ‘vintage’. Hope that helps!
What flowers are these? I am making the jars as centerpieces for my daughters birthday party and would love to use these flowers!!
Great party. Lot’s of fun. Can’t wait to do it again! Thank You!
I’m not sure exactly why but this website is loading
very slow for me. Is anyone else having this issue or is it a issue on my end?
I’ll check back later and see if the problem still exists.
Would you believe I was just searching paint stores allll over town yesterday for the most expensive paint for glass jars?? Soo glad I came across your site via Tonyas “Inspire me Please”. Thx soo much for sharing!!! Can’t wait to look around your site!!
Beautiful Linda and thank you for sharing your talents with us. I am so in love with pink but think this might look great in turquoises as well. Yay 🙂
Help! I’ve followed step by step on about twelve jars and I am running into problems each time. One my paint isn’t leveling for a smooth finish. I have three different brands of acrylic paint and have tried using a brush as well as a sponge brush. Still huge lines. I paint up and down side to side and still streaks. Thin layers thick layers. Ugh also the paint is really thin in some areas and I can see through when light hits it, is that normal? I’ve tried sanding the streaks out, no help. I’ve used new jars old jars I clean them and let them dry before painting. What am I doing wrong? Also getting yellowing on my jars when I spray the sealer on them. Sigh… Is this just not the project for me??
Girl just go buy you some chalk paint. You can get it for 1.99 at hobby lobby even michaels. Apply two coats. Sand it to a smooth finish then seal it. No brushfstrokes. Easy peasy.
I had a very hard time painting these, first coat went on fine but second coat made the first coat peel, not a fan of the paint brush. Spray paint wurks much better.
I made one and I LOVE it! I keep it in my room for flowers. Thanks!
I made these and put two coats of sealer (same type different brand of matte) but it seems like the paint will scratch off if they are bumped or accidentally scratched. Have you found this to be an issue too?
Chris – these are definitely decorative only. Not sure why they would be bumped or scratched? Also, since they’re distressed a few more “distressed” marks should fit right in. But, no, this isn’t a permanent treatment. Sorry about that. 🙂 Linda
Omg I am so not crafty but followed each step meticulously and they came out great!! I’ll be using mine as centerpieces for a bridal shower, thank you so much!!
I’m so happy the tutorial was helpful!!!! 🙂 Linda
I absolutely love these! I want to make them as wedding party gifts for my upcoming wedding. Instead of using them as vases, I would like to use them as drinking classes. Given the paint and sealer, is it safe to drink out of these painted jars? What about washing them?
Emily – this is water based paint, so you can’t drink out of them or wash them. Plus the sealer isn’t safe either to drink from. I highly advise against this idea.
Linda
I am in love with this idea! I have so many jars from my wedding and this would have been awesome. Plus I could have given them away as gifts for the VIP’s!! I didn’t have a solid color choice for my wedding even though it was in the fall, baby soft colors won my heart;) I’m going to do this project and give them m as Christmas gifts this year! Thank you for the wonderful inspiration! ~ Hannah from WI
And thank you for the wonderful comment and compliments!!! You made me smile! 🙂 Linda
I painted my first jar! and im very frustrated, I cant not get the brush strokes to go away no matter what I way or paint or what I use! I used Americana Acrylic paint!
PLEASE HELP ME!!
I want these for center pieces for my wedding.
Make sure you use at least two coats of paint. Sometimes they are runnier than others, so you might even want to try three. And make sure you are are using matte finish paint – not satin or enamel. But, honestly, if you hold it up to the light you can see the brush strokes. That’s part of the distressed look. But try filling one with some water and flowers and set it on the table and see how it looks.
A few more tips. I find that the FolkArt brand of acrylic paint is much thicker than the Americana. But if it’s still bothering you, you might consider using Annie Sloan Chalk Paint. It’s pricier (like $35 for a quart) but that quart goes really far. And if you’re a DIY’er you can probably find some furniture to paint with it too. You can find U.S. dealers by visiting the Annie Sloan website. Hope that helps!
Linda
Thank you for this step-by-step! I bought a couple mason jars from Goodwill today to use as decorative pieces in my living room. I will be having your tips to Upcycled them. Thanks!
So glad I found this on Pinterest. Giving my daughter a pink baby shower. The jars will be perfect for center pieces on the tables. Thank you so much for your tutorial. I mixed three drops of red with white paint to come up with the perfect shade of pink. Using shades of pink carnations with baby’s breath. Can’t wait for her shower. Thanks again.
That sounds beautiful! And I’m so happy I was able to help! 🙂 Linda
P.S. Congratulations on your new-to-be-born granddaughter!
This piece of writing is in fact a good one it helps new the web people, who are wishing for blogging.
I love your beautiful shabby chic jars! We are doing a wedding for our daughter in June and will be doing these in coral, cream and navy. I thought I needed to use chalk paint. I’m happy to see that plain ol acrylic paint will work. : ) Thanks so much for the tute! (BTW your Facebook button goes to Pinterest. I was going to share it on FB and couldn’t except to copy and paste the link)
Thanks for that heads up about the FB button. I’ll see if I can get that fixed! 🙂 Linda
Hi! So, I’ve painted some mason jars of my own with acrylic paint. The problem is…the white looks great and the yellow looks great but pink, purple, and teal come out looking like regular paint, if that makes sense. They don’t have that chalky finish that the white and yellow do. The white is a different brand but the yellow is the same as the pink, purple and teal. What am I doing wrong?? Thanks!
My recommendation is to make sure you aren’t using Satin, Enamel, or Mult-Surface acrylic paint. Just the plain acrylic which is the matte version of the paint. The others can be glossy or translucent, depending on the paint.
Linda
Love this for Mothers Day they are my favorite color
I am having difficulties with paint adhesion. How long do you let the jars dry before putting on another coat? Despite leaving them for 24 hours or longer, after putting the paint on, the next coat still grabs the paint off in spots. I am so frustrated! I have cleaned my jars thoroughly and don’t think that is the problem. Any thoughts? Bad batch of paint? Still some residue on the jars? I read somewhere about baking them in the oven to cure the paint. Have you heard of anything like this? thanks for any help.
I’m not sure whats going wrong. I’m not sure the baking in the oven would work. I think that’s for glass paint, not acrylic paint. Are you using flat acrylic craft paint?
Hello! Thanks for your idea! I just published a post with a compilation of jars and flower vases DIY and yours is in it. Lovely!
Thank you so much for including me and my jars in your compilation! I’m honored! 🙂 Linda
Do you have any experience painting them with chalk or milk paint? Will this work a
So?
I regularly use chalk paint on my jars and I find it’s one of my fave mediums to use. The chalk paint (while not completely permanent) does really adhere stronger to the glass than craft paint. Plus it’s a dream to distress (though, a bit messy with all the chalk dust!). The only concern is price, but there are some new alternatives coming to market like a Rust-Oleum brand as well as Americana has a line at the craft stores that come in small acrylic paint size plastic bottles.
You can make your own chalk paint very easily. I just add 3 or 4 tablespoons of plaster of paris to a tiny amount of water and mix until it’s smooth. I pour it into the cheapest exterior white paint that I can find at Lowes and it works great.
This can work with other colors of paint as well.
Thank you so much, I need all the help I can get. They are wonderful!
I want to do some of these for center pieces at my wedding, would a candle light show through the paint?
Yes, it should – especially if you add a bit more distressing so light will peek out.
Thank you so much for providing this tutorial as it placed my mind at ease regarding the streaks. Was freaking out I wasn’t doing it right but after seeing this I know now
that doing them under light having streaks is normal! Great blog 🙂
Thanks! And once you add some water and flowers you don’t see the streaks at all! 🙂
This website made my days.
Can you place them outside during the summer in the sun and rain
No, I wouldn’t put them outside in inclement weather. The paint is not fully permanent but the clear coat sealant helps to make them more durable. But no submersion in water.
LATE TO JOIN THE PARTY !!!
Your last email is dated 2015 and here i am bringing up the rear!!
These still look relevant to me and i need some spring PAZAZZ so i’m going for it in french blue and yellow!!
Thanks so much for your tutorial………and getting me off the sidelines!
Those are beautiful. I intend to make one for my friend’s birthday. Can you recommend where to buy these flowers and some tips to dry the jars. Many thanks!
Sorry this is so late! My apologies. I buy fresh flowers from the supermarket – cheap and easy! I also use fake ones sometimes from Michaels. I don’t really have tips for drying the jars. Just not too hot or too cold a space, room temperature is best.
What colors do you mix to make the vintage yellow? Love this!